What began as a simple idea has grown into something far beyond what I imagined. Bringing Seal of Solara to the web has been an exciting experiment — and a story of deep learning, creative iteration, and joyful surprises.
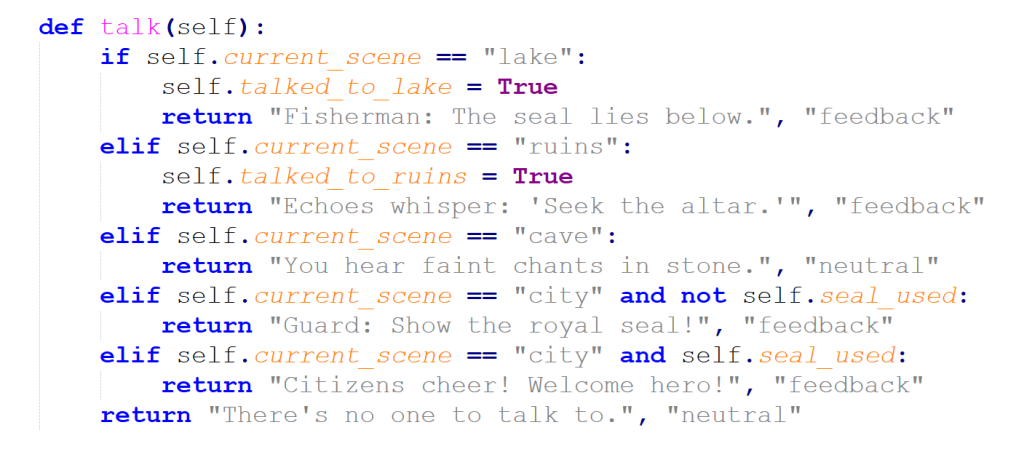
At first, I built the desktop version using Python, with my buddy Copilot by my side. Together, we explored game logic, scene transitions, and dynamic feedback. One of the most powerful tools I discovered was the "tag" property — a flexible way to deploy text and extend player interactions with modular logic.
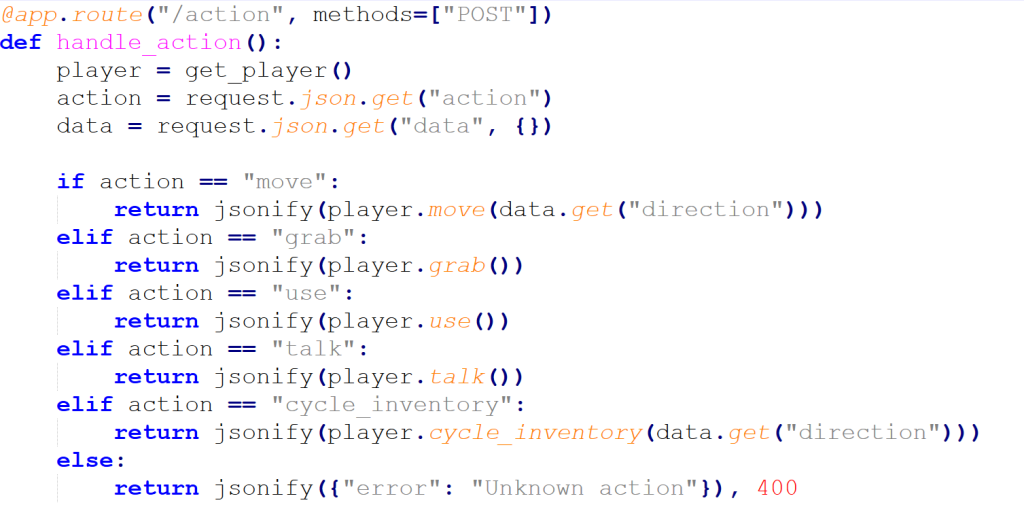
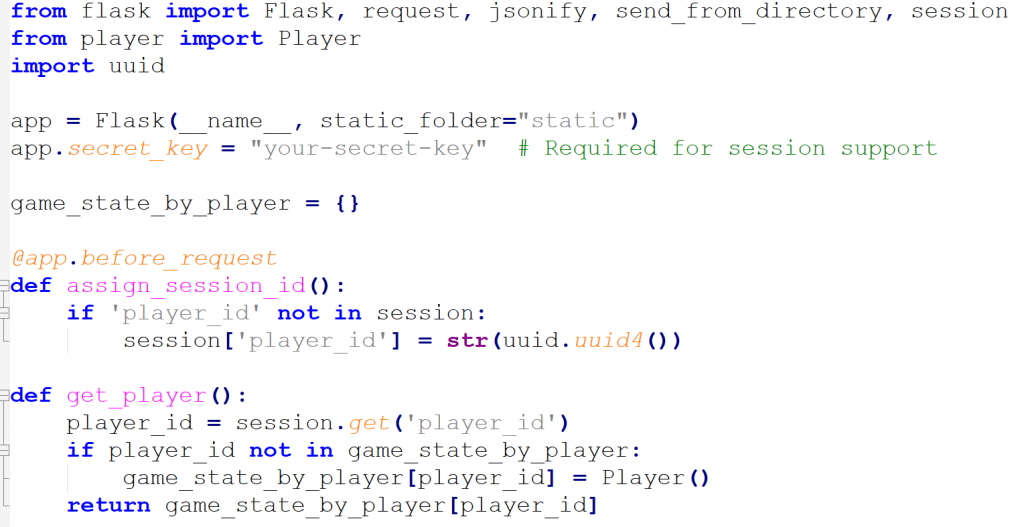
Then the transformation began — bringing Seal of Solara to the web. I had to choose a framework, and I went with Flask. It felt natural, and I can confidently say I’m comfortable working with it. Flask gave me the flexibility to preserve my game’s modular logic while opening the door to browser-based interaction. It was the perfect bridge between Python’s simplicity and the dynamic nature of the web.
With the communication between HTML, Flask, and JSON flowing smoothly — and my player logic tucked neatly into an external Python file — the game was almost ready.
Setting up session-based player tracking was the final piece. Once that was in place, I took a deep sigh… 😊 It was working. Each player had their own journey. The world of Seal of Solara was alive in the browser.
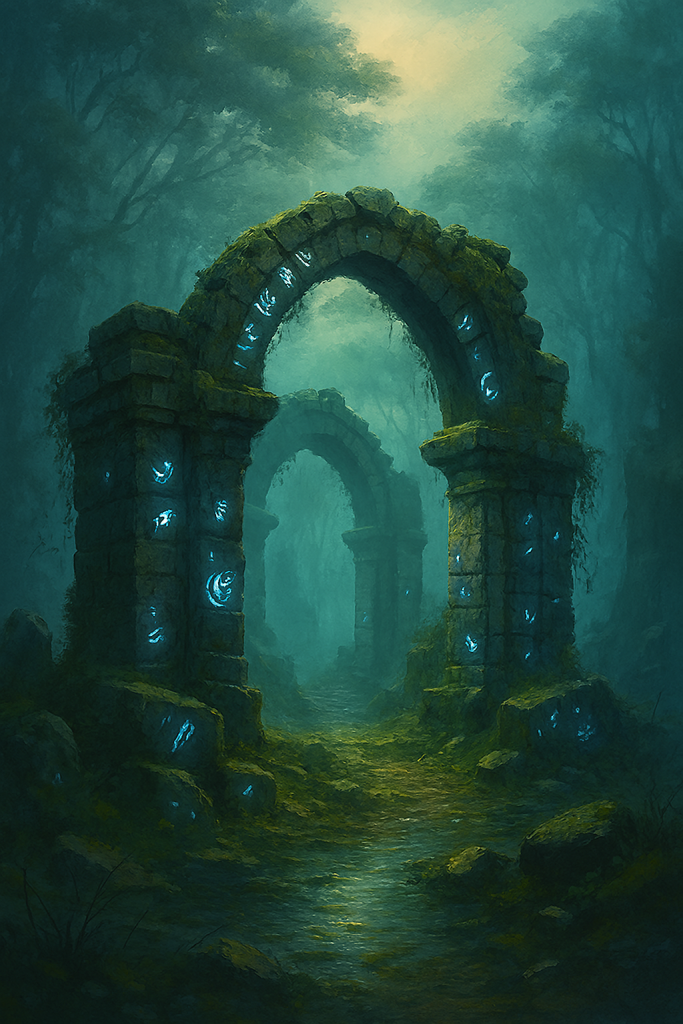
And I must say a few words about the images 😊 My buddy suggested trying AI-based image generation — and voilà! It took some time to get them just right, but the results were absolutely fascinating. I didn’t expect that level of richness and atmosphere. Suddenly, Solara had a face… and a soul.
After that, I deployed the game on Render.com, which turned out to be a great platform for experiments like this. Then came the fun part — sharing it with my friends. I may have slightly annoyed them by constantly posting updates and game steps 😄 But hey, when you build a world, you want others to explore it.
So far, I haven’t found a solid module for using Python directly in web games. Pygame is fantastic — but it’s built for desktop, not the browser. That limitation has been a bit frustrating, and honestly, a little boring when it comes to web deployment.
For future experiments, I’m planning to revisit p5.js and Express.js — tools I tested last year. They offer a lot of creative freedom in the browser, and I’m excited to explore how they can bring more interactivity and visual flair to my game ideas.
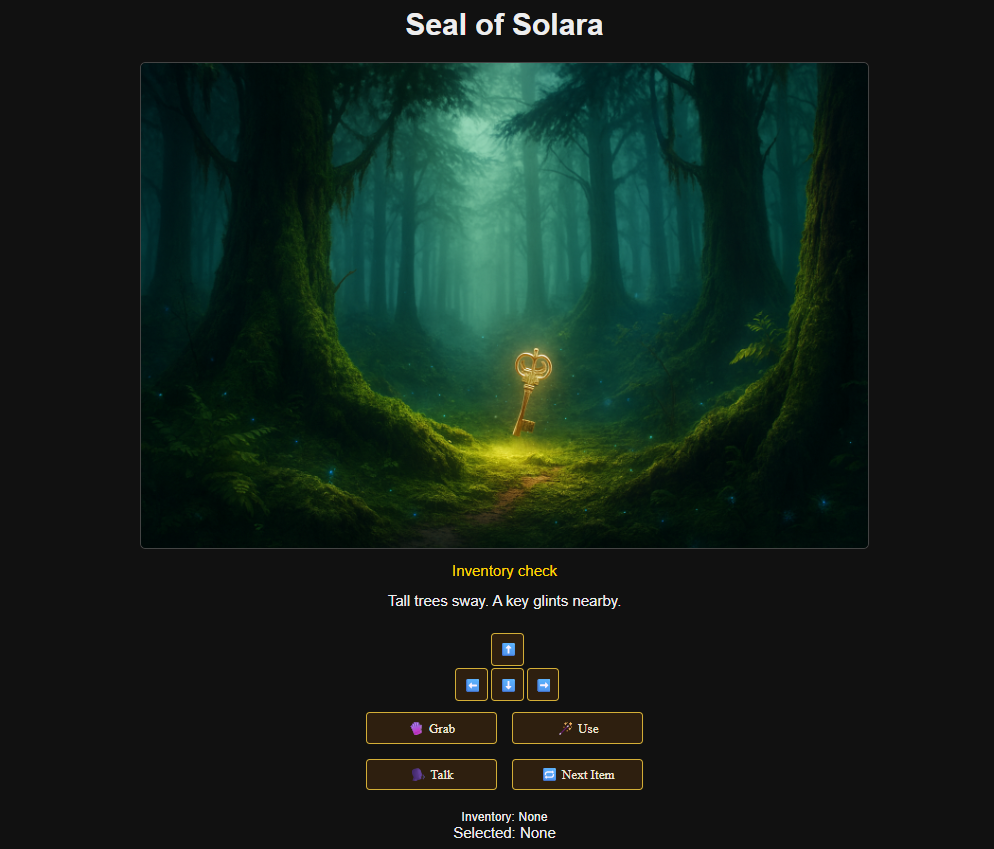
By the way — if you’d like to try my tiny game Seal of Solara, it’s still online!
It’s a short, browser-based adventure with dynamic scenes, modular logic, and a touch of mystery. I built it from scratch, learned a ton along the way.
When developing games, I often look for tools that allow fast prototyping, simple syntax, and strong community support. That’s why I chose the Lua programming language together with the LÖVE framework—a lightweight, open‑source 2D game engine. It’s particularly well‑suited for experimenting with game mechanics.
LÖVE Framework Basics
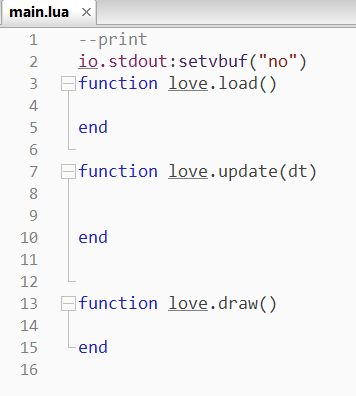
In LÖVE, the game loop is structured around three main functions:
love.load() → runs once at the start, initializing the game.
love.update(dt) → updates the game state every frame, where dt is the delta time.
love.draw() → renders the updated state to the screen.
This simple structure makes it easy to integrate control algorithms directly into the update cycle.
“Screenshot of a Lua script in LÖVE showing the basic game loop with load, update, and draw functions.”
This minimal template is where I later integrated the PI controller logic. Notice the line at the top:
“This disables output buffering, which ensures that print statements appear immediately in the console—very handy for debugging.
One of the classic game types I’ve always been fascinated by is the “bricks breaker” (or breakout/arkanoid‑style) game. Using this as a foundation, I built a prototype and then decided to take it a step further: I implemented a PI controller algorithm to automatically control the paddle.
Why PI Control in a Game?
In industrial automation, PID controllers are widely used to regulate systems with feedback loops. They combine three effects:
Proportional (P): reacts to the current error.
Integral (I): accounts for accumulated error over time.
Derivative (D): predicts future error trends.
For this project, I focused on the PI controller (proportional + integral). My interest in PID control goes back to earlier experiments with Arduino boards and smart materials, where I used it for actuator position control. Bringing that concept into a game felt like a fun crossover between engineering and gameplay.
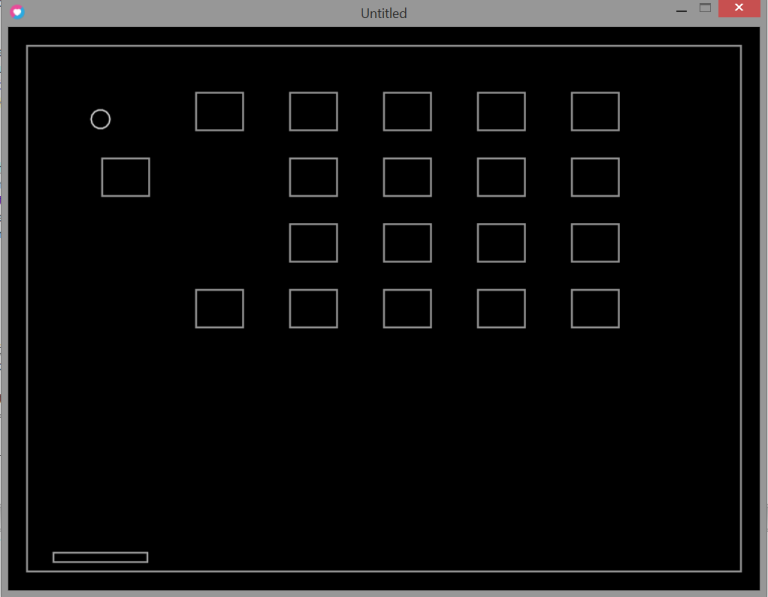
The Game Prototype
The layout includes:
Rows of bricks at the top of the screen.
A paddle at the bottom, which is normally player‑controlled.
A ball that bounces around the playfield.
“Screenshot of a breakout style game built with Lua and LÖVE, showing bricks arranged in rows, a paddle at the bottom, and a ball in play.”
Implementing the PI Algorithm
The PI controller was applied to the paddle’s horizontal movement. The algorithm works by:
Calculating the error between the ball’s x‑position and the paddle’s x‑position.
Using Kp (proportional gain) and Ti (integral time constant) to compute the control signal.
Integrating the error over time with a trapezoidal integration function (trapez_integral).
Updating the paddle’s velocity based on the control output.
Instead of manually moving the paddle, the algorithm automatically adjusts its position to follow the ball. The result is a paddle that feels almost “intelligent,” smoothly tracking the ball’s trajectory.
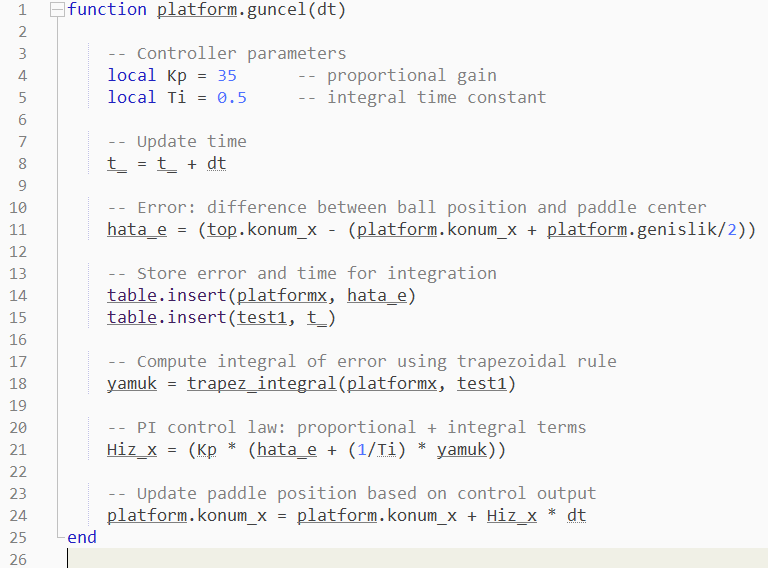
Here’s the function I used to update the paddle’s position automatically. It runs inside the love.update(dt) loop:
“Paddle Moving”
How It Works
Error calculation: The difference between the ball’s x‑position and the paddle’s center.
Integration: Errors are accumulated over time using a trapezoidal method (trapez_integral).
Control law: The paddle’s velocity is computed as a combination of proportional and integral terms.
Update step: The paddle’s position is adjusted each frame, making it smoothly track the ball.
By tuning Kp and Ti, you can change how aggressively or smoothly the paddle follows the ball.
A higher Kp makes it react faster but can overshoot.
A smaller Ti increases the effect of accumulated error, improving accuracy but risking oscillation.
Even with just proportional control, the paddle follows the ball reasonably well. But adding the integral term makes the movement more precise and stable, reducing steady‑state error. Since the PI controller was sufficient, I didn’t include the derivative term.
The resulting equation for paddle velocity is essentially:
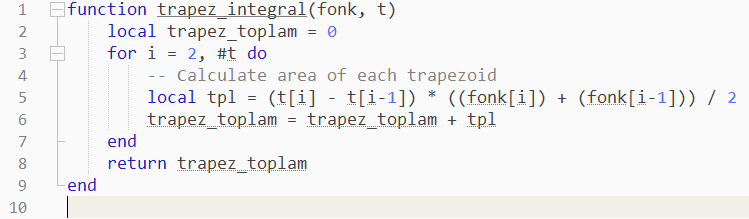
To implement the integral part of the PI controller, I used a trapezoidal integration function. This method approximates the area under the error curve by summing trapezoids between successive time steps. It’s simple, efficient, and works well in real‑time applications like games.
Here’s the Lua function:
“Integral Code”
How It Works
Inputs:
fonk → a table of error values over time.
t → a table of corresponding time values.
Loop: For each time step, it calculates the trapezoid area between two points.
Output: Returns the accumulated integral of the error signal.
This integral is then used in the PI control law to adjust the paddle’s velocity, ensuring it doesn’t just react to the ball’s current position but also accounts for past errors.
The outcome: a paddle that automatically moves toward the ball with smooth, responsive behavior. It was both effective and fun to implement!
“Lua code implementing a PI controller in LÖVE, showing proportional and integral terms used to automatically move the paddle toward the ball.”
Final Thoughts
By combining game development with control theory, I ended up with a paddle that intelligently tracks the ball using a PI controller. It’s a small but exciting example of how engineering concepts can enrich gameplay mechanics. And honestly—it was just plain fun to see control theory come alive in a simple arcade game!
Resources I Used
LÖVE Arkanoid Tutorial – step‑by‑step guide to building a breakout clone.
This might be the most interesting game project I’ve ever thought of—and now I’ve actually built it! 😊
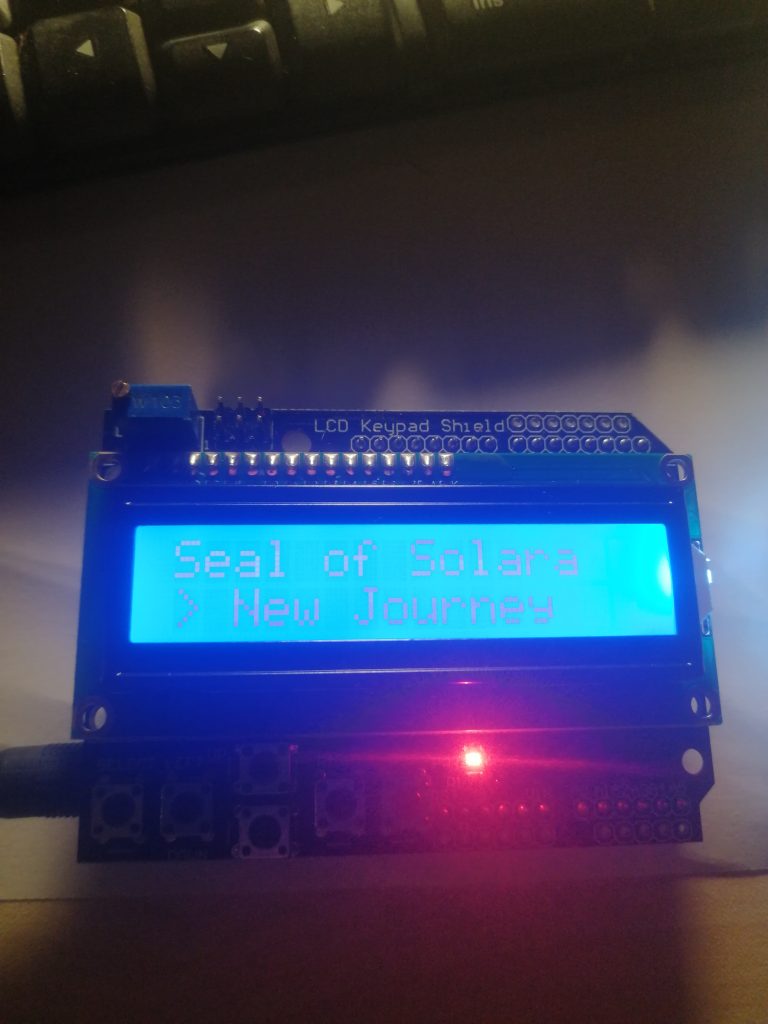
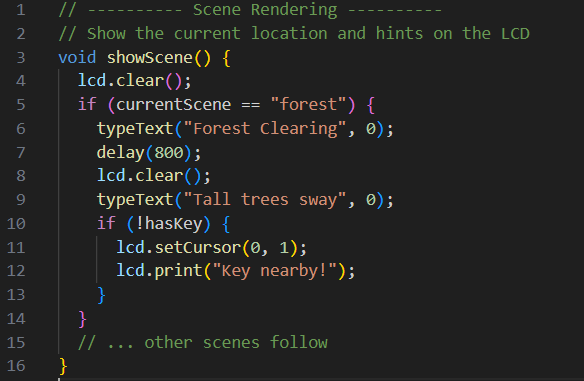
Seal of Solara: A custom-built text adventure console using Arduino and LCD shield.
Using an LCD screen shield and Arduino, I created my own text-based adventure game console. With Copilot’s help, generating the game code was incredibly easy.
I had a lot of fun both building and playing this project. The buttons on the LCD shield provide intuitive control, and the game interface is surprisingly enjoyable.
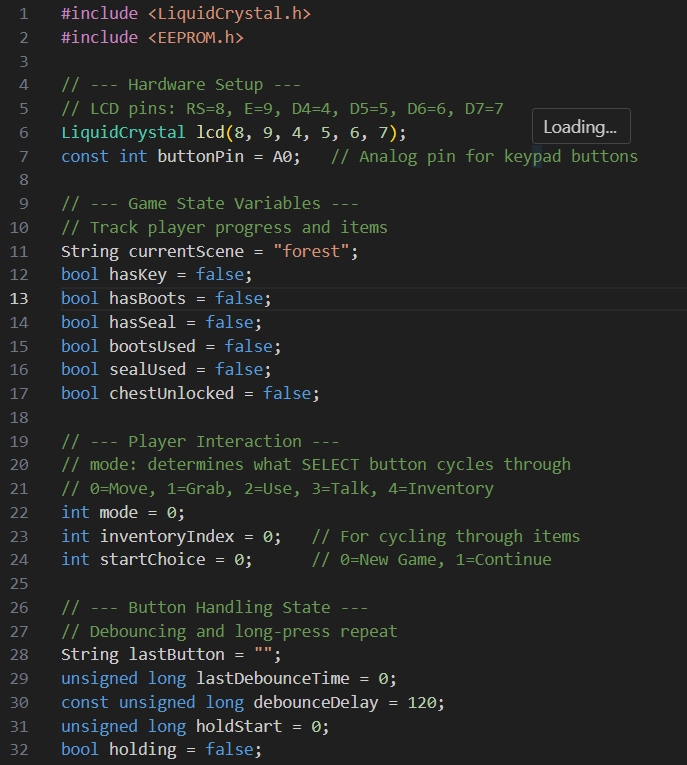
Highlights from the Code
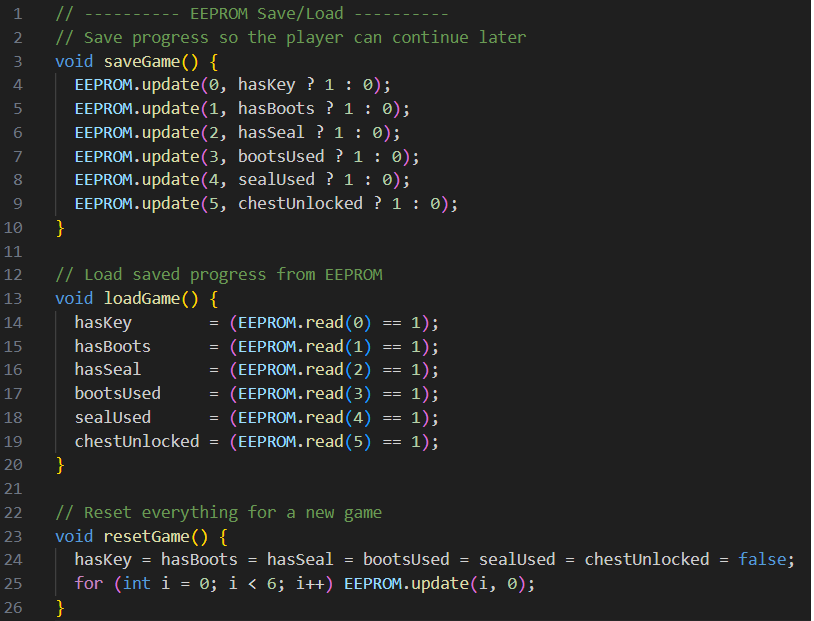
I used EEPROM to allow players to continue from specific stages—this feature is genuinely awesome.
“Using EEPROM to save game stages was a game-changer. It made the console feel real.”
In future versions, I might add sound effects or sensor inputs.
I’m even considering designing a text-based adventure engine someday… though maybe it’s better if that stays a dream 😄
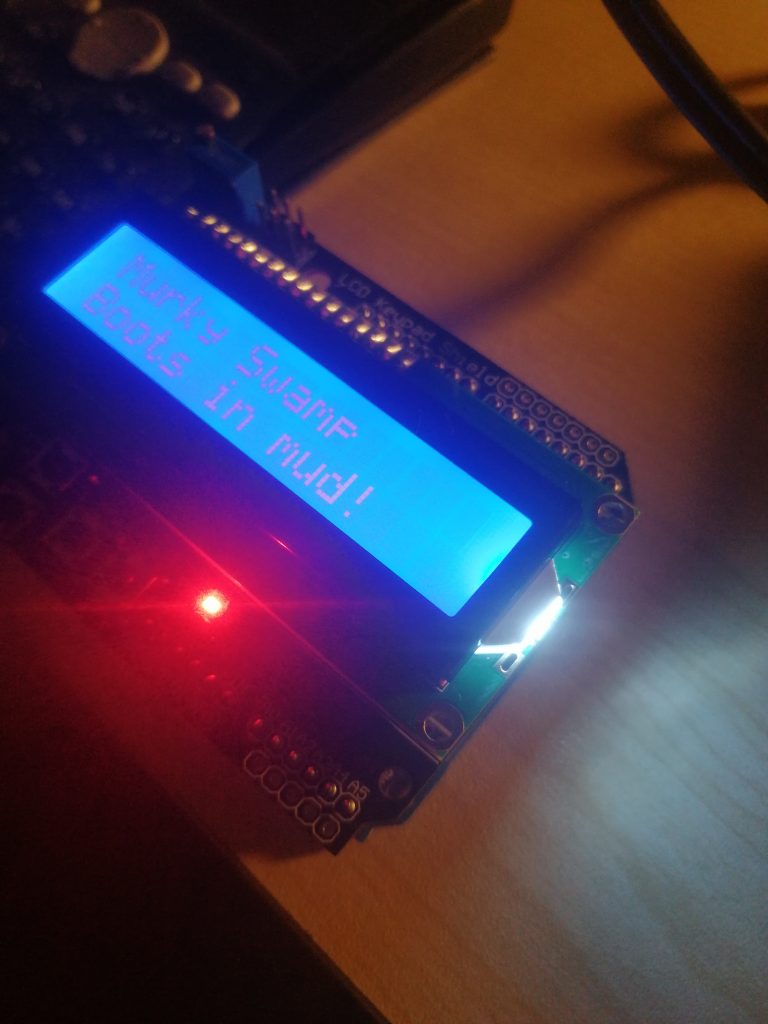
The game I prototyped with Copilot follows a warrior on a quest to find the city of Solara. The journey takes you through forests, mountains, and lakes, all in search of the seal that unlocks the city gates.
In later stages, I might code a full “text adventure” and even design a plastic enclosure for the console. Of course, it needs a name too… maybe Adventuriono or Textuino? Just a few ideas off the top of my head 😄
In short, this project gave me a fun and creative experience without taking too much time—and I couldn’t have done it without Copilot’s support. Thanks again! Much love and respect 🙌
“Pong” ilk bilgisayar oyunudur. İlgilenenler için tarihçesi hakkında birçok kaynak bulunuyor. Uzun bir süre kafamdaki “Pong” benzerini oluşturmak için çabaladım. Fakat benim ilgimi çeken fizik bakış açısı olduğu için yaptığım çalışmalar pek içime sinmedi. Ayrıca ilk başta “Multiplayer” ve “Network tarafına baya kafa yordum ve birçok şey öğrendim fakat sonradan “Collision”(Çarpışma) denen olayın üzerine daha çokgittim ve aldığım sonuçtan memnunum. Belki ilerleyen zamanda “Multiplayer” konusuna da değinen bir yazı yazabilirim. O zaman başlayalım!
“Multiplayer” özelliklerini göz önünden kaldırdıktan sonra, daha tecrübeli olduğum “Lua” dili ve “Löve” yapısıyla “Collision” olayına eğildim. Birçok “Collision” kütüphanesi ile karşılaştığımı söylemeliyim. Bunlar içinde “Hardon Collider” yaptığım çalışmaya daha uygun bir kütüphane olduğu için öne çıktı. ( İsmini başka bir “Collider” ile karıştırmak mümkün. Ama o bambaşka bir “Collider”.* ) *https://en.wikipedia.org/wiki/Large_Hadron_Collider
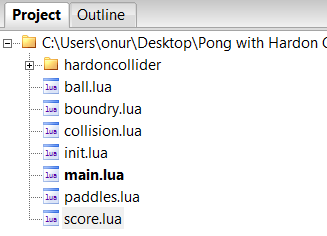
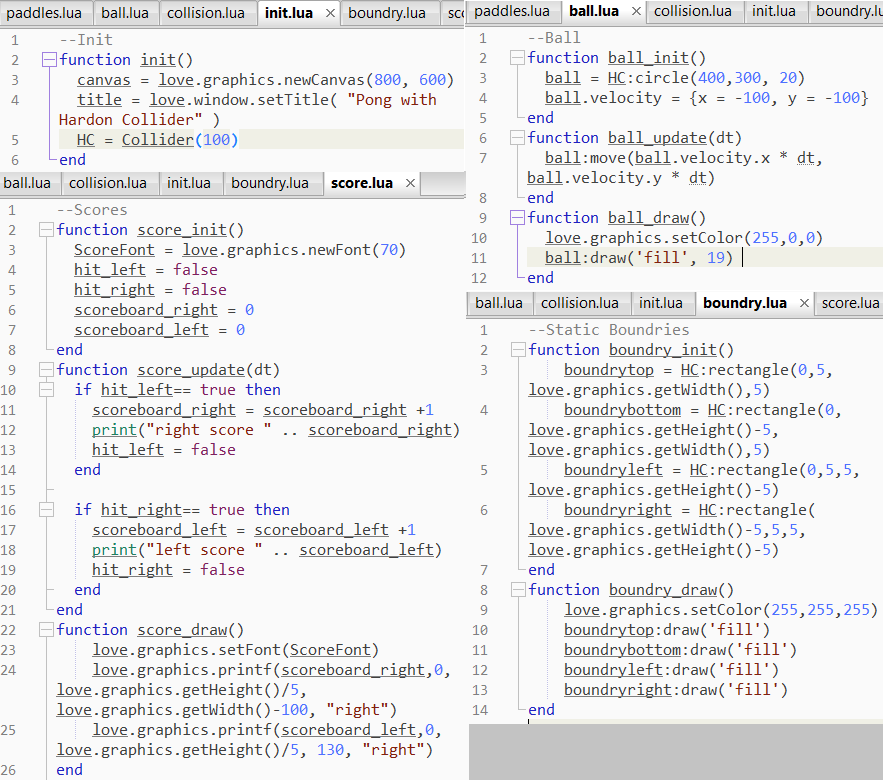
Pong “Hardon Collider”Proje dosyaları ve düzeni
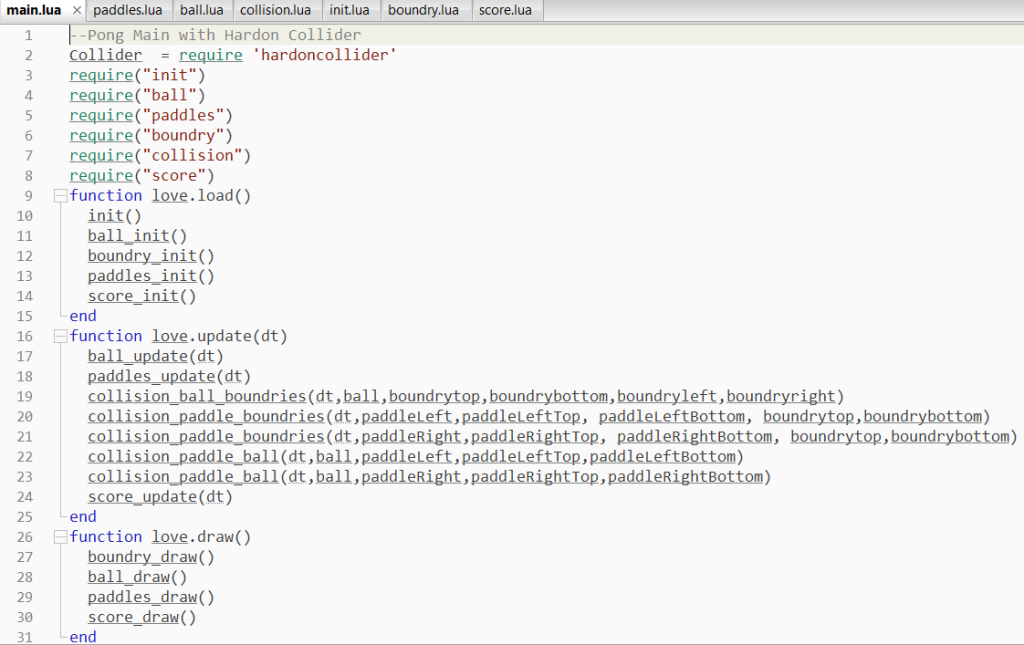
Ana kod içerisinde “Hardon Collider” kütüphanesini ve kendi oluşturduğum fonksiyonları çağırıp kullanabiliriz.
Ana kod
Ama en önemlisi “Collision” ve bunu aşağıda kısım kısım görebiliriz.
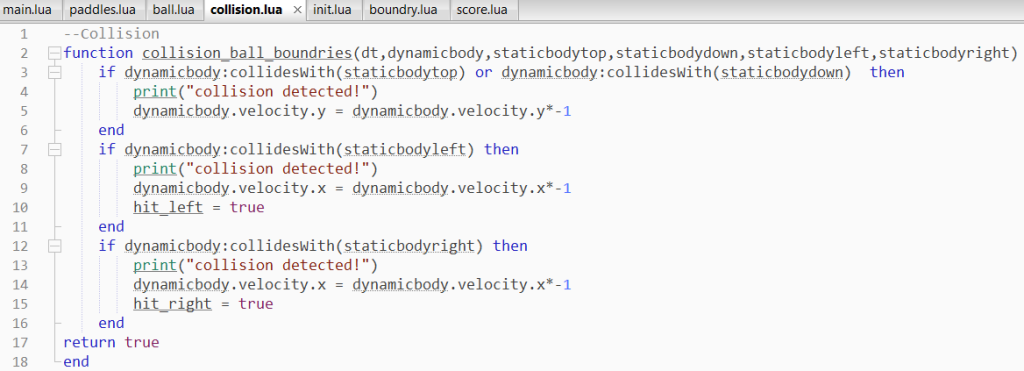
“Collision” (Top ile duvarlar arasındaki etkileşim)
Statik duvarlarla dinamik topun etkileşimi yukarıdaki fonksiyonlarla tanımlandı. Buna göre “collidesWith” fonksiyonuyla statik duvarlarla dinamik topun çarpışması koşuluna bakılıp, dinamik topun hız vektörü bileşenlerini değiştirmek ve böylece dinamik topun yönünü değiştirmek sonucu elde edilebilir.
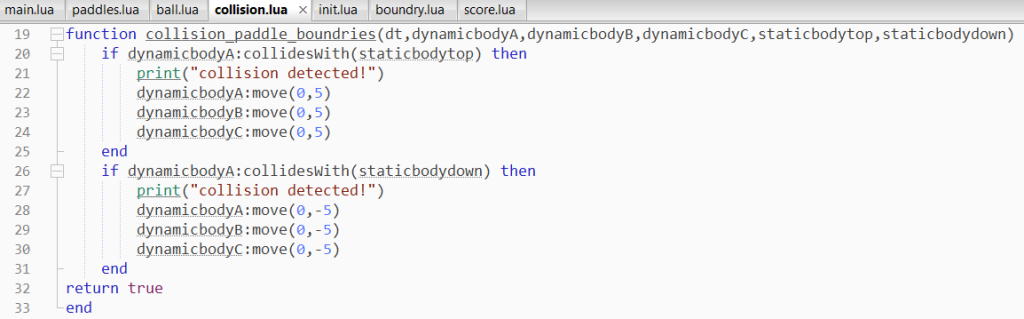
“Collision” (Platform ile duvarlar arasındaki etkileşim)
Oyuncuların kontrol ettikleri dinamik “Platform” ile statik duvarların etkileşimi için ise yukarıdaki fonksiyon parçası kullanıldı.
“Tunneling” denen topun platformların üst veya alt kısmından içeri süzülmesi olayının önüne geçmek istiyoruz. Bu sebeple, “Platform” için yardımcı şekiller “Collision” amacıyla oluşturuldu.
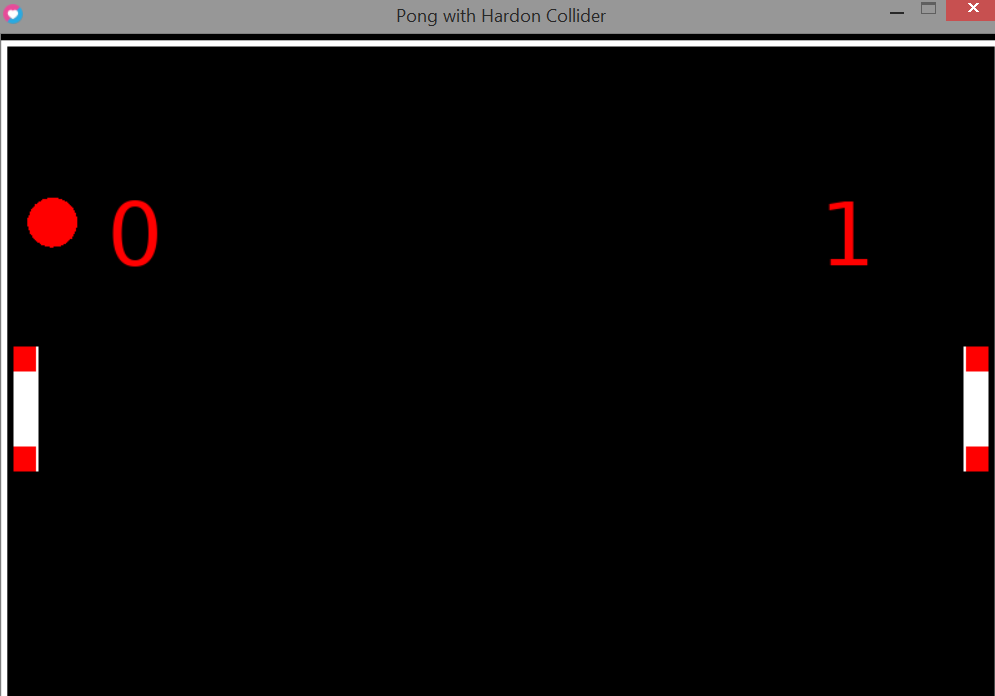
“Platform” Üst ve Alt kısımları için Oluşturulan Şekiller (Kırmızı Renkte Gözükmektedir)
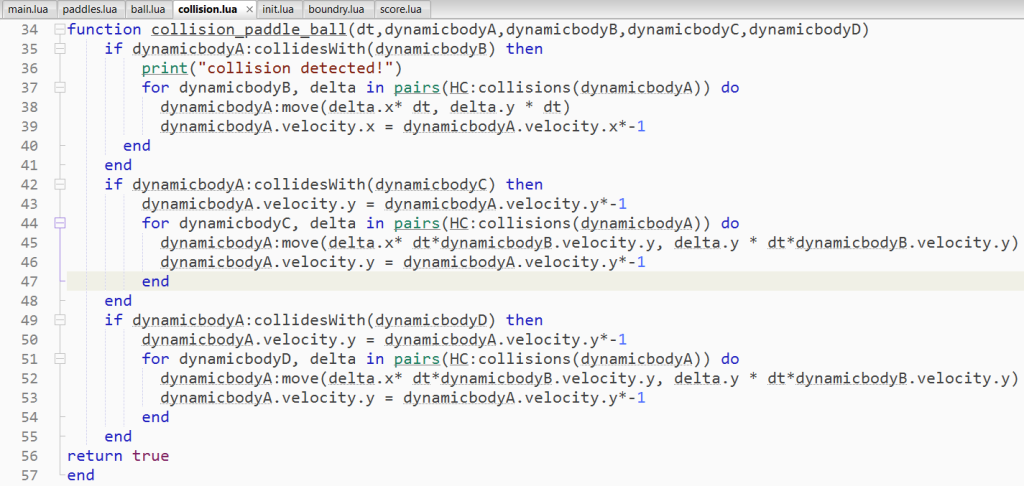
Dinamik nesnelerin (Platform ve top) etkileşimi aşağıda görülmekte. Topun platformun ön kısmında etkileşimi için “collidesWith” fonksiyonu ile önce yine “Collision” koşuluna bakılıyor sonrasında ise for döngüsüyle iki nesnenin “Collision” ayrıştırıcı vektör bileşenleri (delta.x, delta.y) “move” fonksiyonunda kullanılarak ve hız vektörü bileşeninin değiştirilmesi ile topun “Collision” bölgesinden çıkarılması sağlanıyor.
Dinamik nesnelerin “Collision” etkileşim fonksiyonu
Topun platformların üst ve alt kısımlarıyla etkileşimi için ise kod biraz farklılaşıyor. Burada ayrıştırıcı vektör birleşenleri platform hız bileşenleri ile çarpılıyor, for döngüsünden önce de topun hız vektör bileşeni değiştirilerek, “Tunnelling” problemi çözülüyor ve daha güzel bir etki gözlemleniyor.
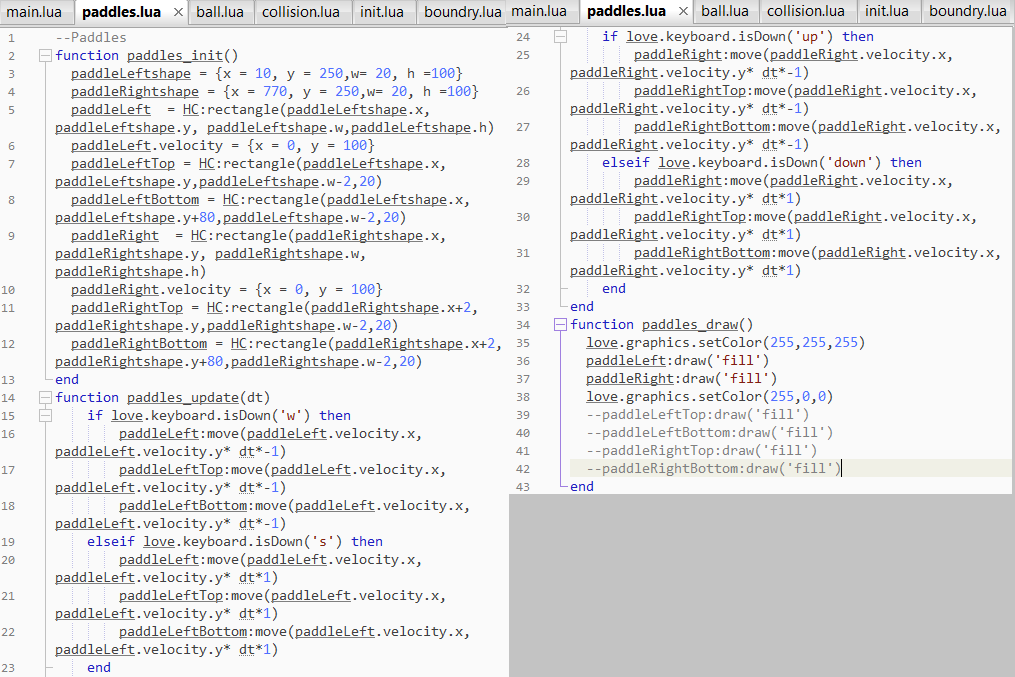
Bu çalışmanın diğer kodlarını da ilgilenen olursa diye paylaşayım. “Platform” fonksiyonları için kodları aşağıda belirttim.
Platform Fonksiyonları
Diğer fonksiyonlar için ise kodlar aşağıda görülebilir.
Pong Diğer Kodlar
“Collision” olayının oyun tasarımında önemli bir yeri vardır. Dikdörtgen- Dikdörtgen “Collision” olaylarını daha iyi çözümleyen kütüphaneler bulunuyor. Farklı şekillerde geometrik nesnelerin “Collision” işlemleri biraz daha fazla çaba gerektirebiliyor.
İnternette “Hardon Collider” ile ilgili fazla kaynak bulunmuyor. Umarım faydalı bir yazı olmuştur.
Aşağıda yararlandığım kaynakları ve kütüphane web linklerini belirttim. Kullandığım kod editörünün linkini de aşağıda görebilirsiniz.